
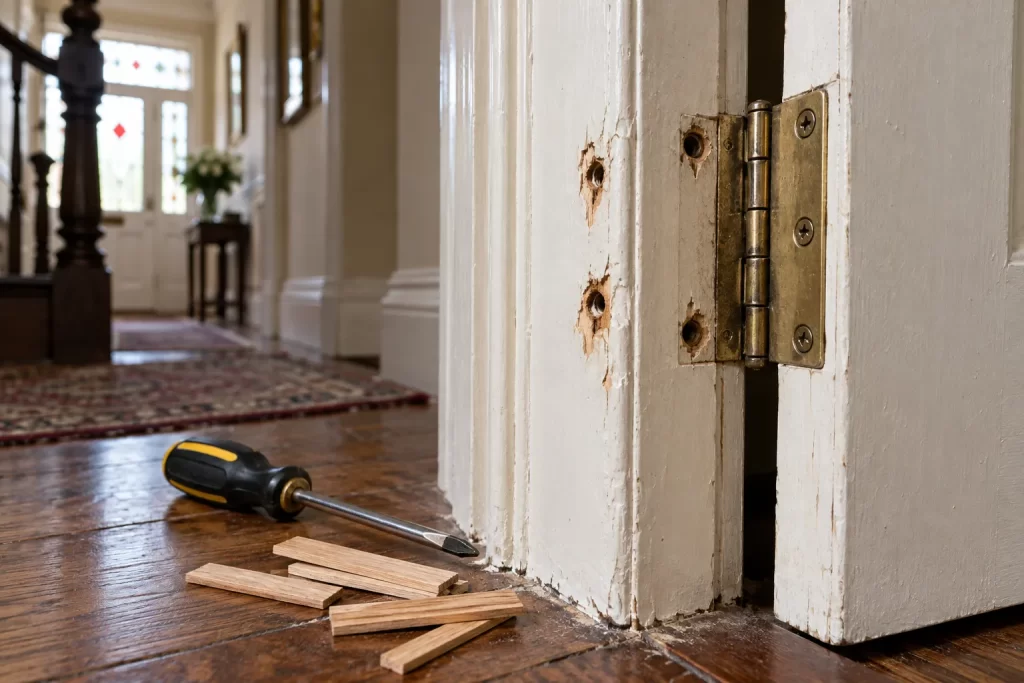
A hinge screw that turns endlessly is not holding the door. The timber thread inside the frame has been crushed or torn away, so tightening harder only enlarges the hole. Left alone, the hinge begins to move, the door drops and the latch no longer lines up. The repair is usually manageable on an ordinary internal timber frame, provided the surrounding wood is dry and intact.
The aim is to give the screw sound material to bite into while keeping the hinge exactly where it belongs. Filling the hole with soft putty or forcing in an oversized screw may feel secure for a day, but neither is a dependable structural repair. This guide sets out stronger options and explains when the damaged frame needs a carpenter.
Confirm that the screw hole is the real problem
Support the open door with a wedge, then watch the hinge while gently lifting the handle side. Movement between the hinge leaf and frame points to loose frame screws. Movement between the hinge and door points to stripped holes in the door edge instead. A worn hinge pin produces play within the hinge knuckle and will not be cured by repairing screw holes.
Remove one suspect screw and inspect it. A screw coated with soft, dark material may indicate decayed timber. Fresh wood dust and a clean but enlarged hole suggest mechanical wear. Check for cracks running from the hinge recess, damp staining and previous repairs. If the frame is wet, fix the moisture source before closing it up. The leaks service can help where staining is active rather than historic.
Choose a repair that suits the damage
There are three sensible levels of repair. A longer screw can work when the lining hole is worn but substantial framing timber sits behind it. Hardwood slivers bonded into the hole suit local thread damage in solid timber. A drilled hardwood dowel is the strongest neat repair for a badly enlarged hole, but it demands accurate drilling. Split, rotten or repeatedly patched timber needs a more extensive section repair.
What not to use
Matchsticks and cocktail sticks are often suggested because they are convenient. They can work as an emergency packing material in a light internal door, but their soft, irregular timber and waxed surfaces are not ideal. Plastic wall plugs are designed for masonry or sheet materials, not as universal substitutes for damaged timber. General-purpose filler is too brittle and has little screw-holding strength.
Tools and materials
- Door wedge or stable support
- Correct Pozidriv or Phillips screwdriver
- Sharp drill bits and depth tape
- Hardwood slivers or a straight-grained hardwood dowel
- Quality wood glue
- Flush-cut saw or sharp chisel
- Replacement countersunk wood screws of suitable gauge and length
- Vacuum and eye protection
Do not select a longer screw blindly. Hidden cables and pipes can pass near a frame, and the construction behind a thin lining is not always obvious. Use a length appropriate to the known frame build-up and stop if there is any uncertainty.
Step 1: support the door and remove one hinge leaf
Open the door far enough to reach the screws and place a wedge beneath its outer edge. Mark the hinge outline with a sharp pencil if paint does not already show the position. Remove one hinge from the frame at a time. Keeping the other hinges attached helps preserve alignment and avoids handling the full door.
If paint bridges the hinge edge, score it lightly before lifting the leaf. Pulling through several paint layers can tear the frame finish. Keep the screws in order and note whether different lengths were used. A screw with a damaged head should be replaced even if its thread looks usable.
Step 2: repair a moderately worn hole with hardwood slivers
Vacuum loose fibres from the hole. Cut two or three narrow hardwood slivers long enough to reach the bottom without protruding far beyond the surface. Coat them sparingly with wood glue and tap them in so the grain runs along their length. The aim is a dense timber repair, not a plug floating in a pool of glue.
Allow the adhesive to cure fully according to its instructions. Trim the slivers flush using a sharp tool held flat to the frame. Do not refit the screw while the glue is wet: the screw can drag the repair out, and it becomes difficult to centre the new pilot hole.
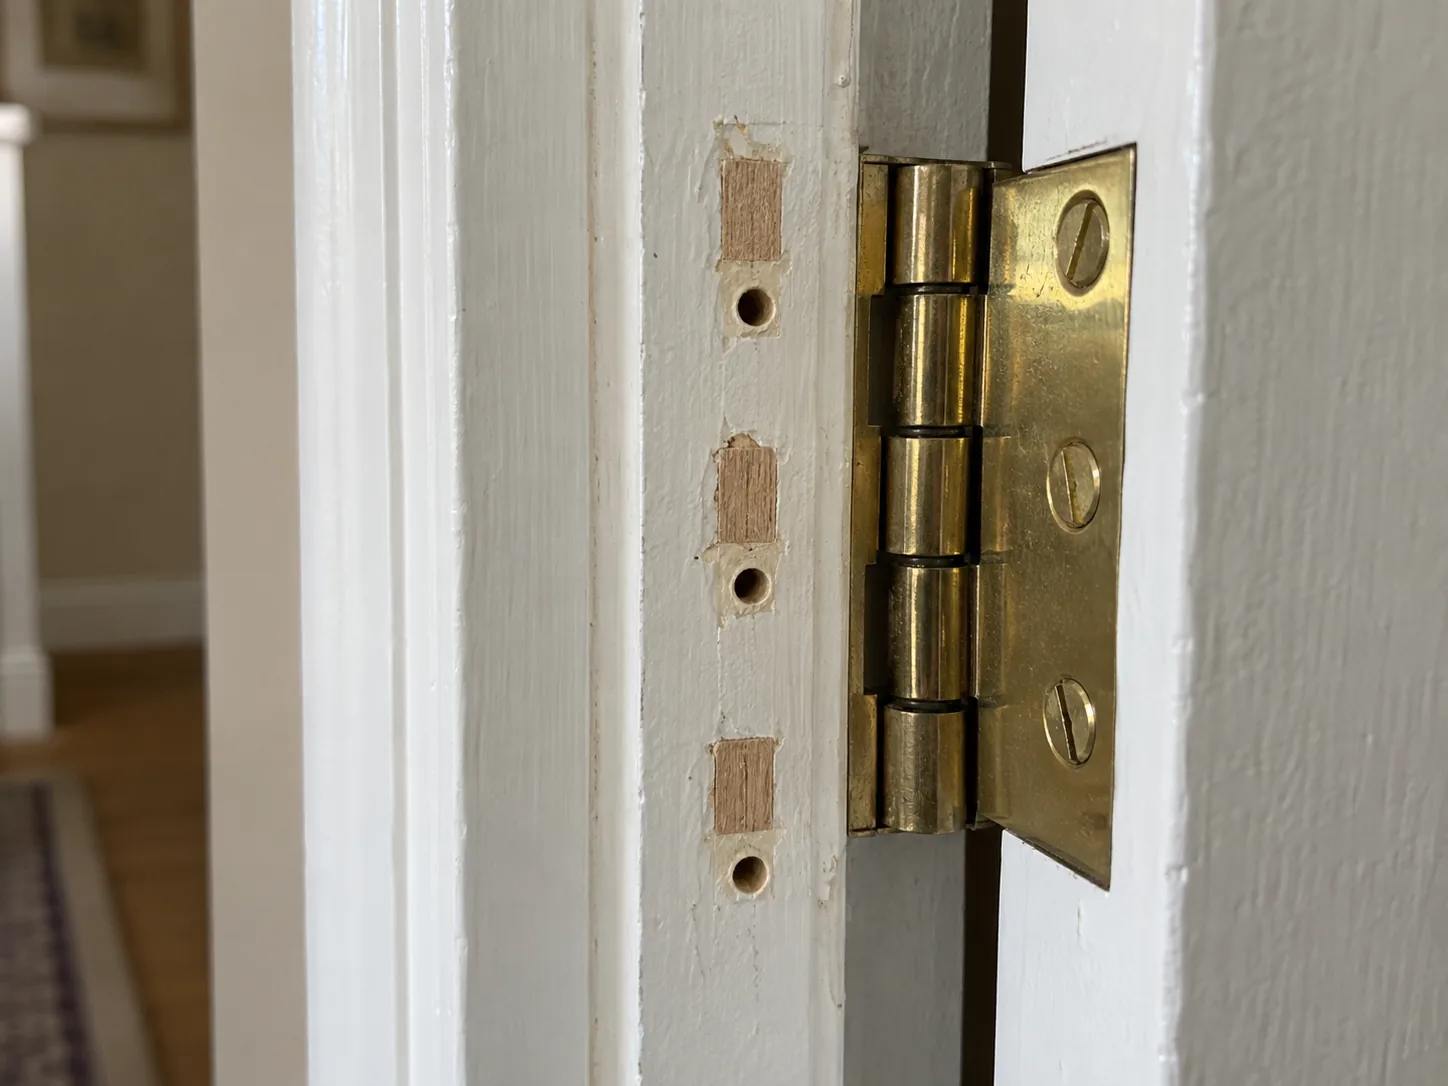
Step 3: use a dowel for a badly enlarged hole
Where the hole is irregular or has already been patched several times, a dowel creates a known piece of sound timber. Choose a drill size that matches the dowel. Mark the bit with tape so you cannot drill too deep. Keep the drill square to the hinge recess and remove only enough material to form a clean round hole.
Glue in the dowel, keeping its grain orientation suitable for taking a screw, and let it cure. Cut it flush without damaging the recess. This method is less forgiving near the edge of a thin lining: an oversized dowel or poorly centred hole can split the frame. Ask a carpenter to handle it if there is little sound wood around the hole.
Step 4: mark and drill the new pilot hole
Put the hinge leaf back inside its original recess and hold it firmly against the correct edges. Use the centre of the countersunk hinge hole as the guide. A bradawl helps establish the centre before drilling. Select a pilot bit slightly smaller than the screw’s solid core, not its outer thread diameter.
Drill straight and only to the planned depth. A pilot hole that wanders pulls the hinge sideways as the screw tightens. That small shift can change the gap at the far side of the door and recreate the rubbing described in the guide to fixing a door that catches the floor.
Step 5: refit the hinge without overtightening
Fit a countersunk screw whose head sits fully inside the hinge. Tighten it until the leaf is secure and flat, then stop. The screw should not distort the metal or crush the surrounding timber. Fit the remaining repaired screws and remove the support wedge gradually while watching for movement.
Open and close the door several times. Check the top and side gaps, latch operation and whether the hinge remains still. If the door position changed, confirm that the leaf is seated flat in its recess before attempting any further adjustment.
Can a longer screw solve it?
A longer screw is useful when it can pass through a worn lining hole and reach a known structural stud or frame behind it. It is not a cure when the visible frame is split, the screw angle is wrong or the longer screw would enter an unknown void. Match the head to the hinge and avoid a gauge so large that it jams in the metal countersink.
On a heavy door, one suitably positioned longer screw in the top hinge can improve load transfer, but the rest of the hinge and frame must also be sound. This is not a substitute for correct door hanging.
Common mistakes
- Repairing every hinge at once and losing the original alignment.
- Driving a screw into wet glue before the timber repair has cured.
- Skipping the pilot hole and splitting the repaired area.
- Using filler, plastic plugs or soft debris where structural timber is needed.
- Choosing a screw head that stands proud and prevents the hinge closing.
- Using an impact driver and stripping the fresh repair.
- Ignoring decay, frame cracks or repeated movement elsewhere.
When to stop and arrange a proper frame repair
Do not rely on a local plug if the timber crumbles under light pressure, a crack extends beyond the hinge recess, or several hinges have pulled away. Heavy glazed doors, external security doors and fire doors deserve professional attention. Their weight, closing action and clearances have safety implications beyond a loose internal cupboard-style hinge.
A door repair visit can combine hinge repair with frame alignment and latch adjustment. That is usually more economical than repeating temporary fixes that remove more timber each time.
The test of the repair is movement, not appearance
A neat surface is useful, but the important result is a hinge that remains still under the door’s weight. Support the door, rebuild the damaged hole with sound hardwood, drill a centred pilot and tighten with restraint. If the surrounding frame cannot carry the load, treat that as the real problem rather than hiding it beneath a larger screw.

