A flat-pack joint that opens after assembly is not always cured by turning its cam lock harder. The cam may be facing the wrong way, the mating bolt may sit at the wrong depth, the panels may not be fully together, or the particleboard around a fixing may have failed. If you keep turning after the cam reaches its stop, the metal or surrounding board can break. Unload the furniture and identify the fault before trying again.
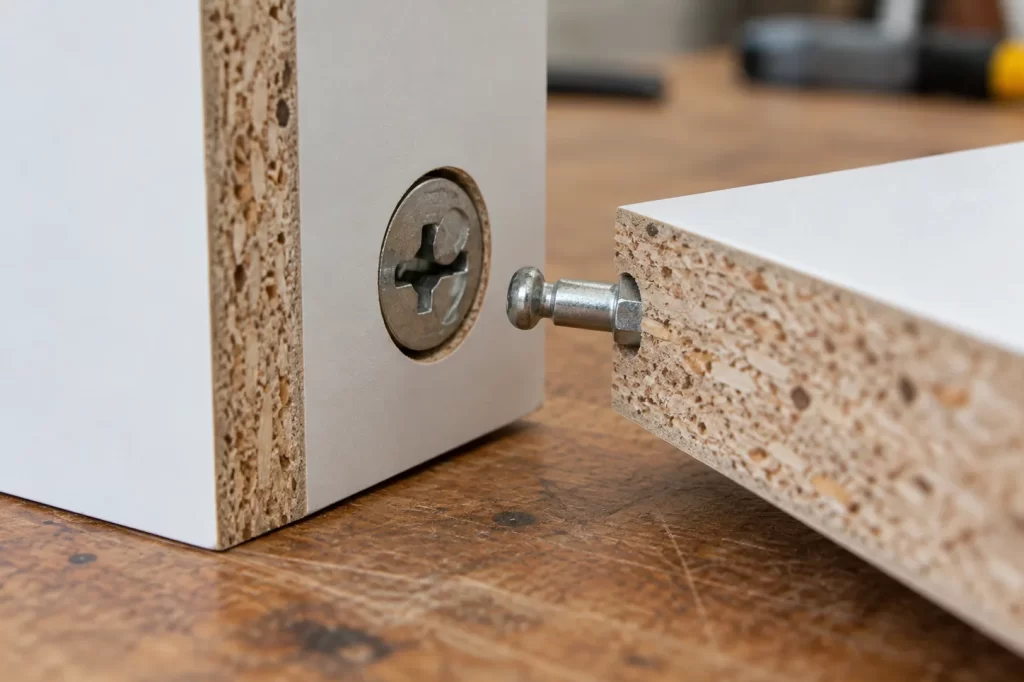
Cam-and-bolt connectors are common in wardrobes, cabinets and desks. The round cam sits in a large hole in one panel; a bolt projects from the joining panel. Turning the cam draws the bolt head inward and pulls the two panels together. Different manufacturers use different connectors and rotation directions, so the assembly instructions for your item take priority over a generic rule.
Make the furniture safe to inspect
Remove books, crockery, clothing or equipment from the affected unit. If a tall piece is beginning to lean, do not pull it around alone or rely on the remaining joints to hold it upright. Have another adult support it, or arrange help. Keep children away from an unstable wardrobe or shelving unit. Wall anchoring, where specified, does not make a failed structural joint safe by itself.
Photograph the joint before loosening anything. Note which edges have separated and whether adjacent panels are still square. Place small fittings in a tray so a missing connector does not become a second problem. If the furniture is already partly disassembled, support each panel before releasing a cam; a side panel can fall once the final connector is unlocked.
Inspect the assembly sheet if you still have it. It identifies bolt length, cam type, dowel position and the order in which panels should be joined. A cam from another item may fit the hole yet engage the bolt differently. The site’s wider article on furniture assembly problems covers situations where the whole assembly needs help; here the focus is the cam joint itself.
Check cam orientation before applying force
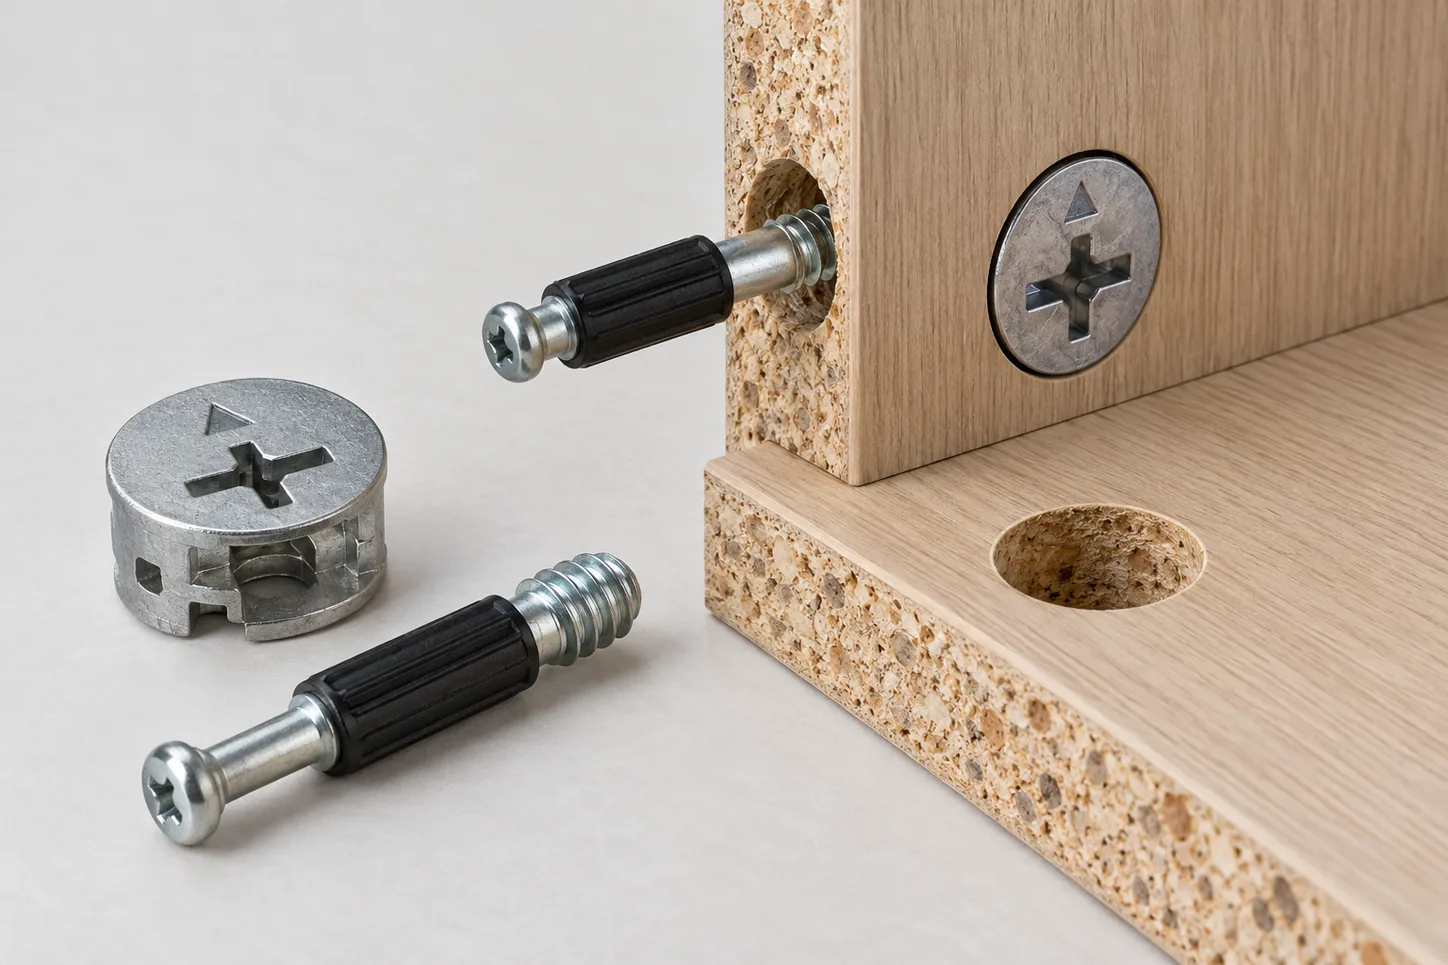
Many cams show a small arrow or opening that should face the bolt as the panels are brought together. If the cam is turned into its locked position before the bolt head enters, the bolt cannot engage. Return it gently to its entry position according to the instructions. Use a screwdriver that fits the recess fully, so you do not strip the head. Keep the tool square to the cam and stop when resistance changes markedly.
Look into the cam hole with a torch. The disc should sit flush or at the depth shown in the instructions, not tilted above the panel. A distorted cam can rotate without drawing the bolt. If a cam has cracked, chipped or lost its internal hook, replace it with a compatible part rather than trying to bend it back. Note the diameter, thickness and pattern or part code before ordering.
Do not assume every visible round fitting is a cam lock. Some fasteners are decorative covers or part of a different connector system. The arrow, bolt path and maker’s drawing are the reliable clues. If you cannot see how a connector releases, forcing it can tear a large chunk from the panel face.
Check the bolt and panel fit
The mating bolt must project by the right amount. Too shallow, and its head never reaches the cam. Too far out, and the panels may remain apart or the cam may not close. Compare it with an intact joint on the same item and the manufacturer’s diagram. If the bolt screws into a plastic insert, check whether the insert itself turns in the board. Tightening the bolt into a failed insert will not restore grip.
Bring the panel edges together by hand while supporting their weight. They should align without a large gap or twist. A dowel set in the wrong hole, a cable trapped between panels, swollen board or a shelf installed out of sequence can prevent closure. Turning the cam against that obstruction puts high force into a small area of particleboard. Resolve the fit before locking.
Check the finish edges. A thin piece of laminate can fold into the joint and keep the panels apart, while a chipped edge may reveal crushed core material. A little surface damage does not always mean the whole panel is unusable, but a structural corner that has split or crumbled around the cam hole needs more than retightening. The existing guide to stripped screw holes in flat-pack furniture addresses screw grip; a blown cam hole may require a different repair or a replacement panel.
Retighten only a sound joint
When the cam, bolt, dowel and panel edges are sound, align the panels and push them fully together in the order specified by the assembly instructions. Turn the cam steadily until it reaches its designed locked position. It should draw the panels together; it should not need a long sequence of forced turns. Some cams lock after about a partial turn, but the exact travel varies. Do not use an impact driver on these fittings.
Repeat for the other connectors at that joint, alternating gently so one corner is not pulled tight while the opposite corner stays open. Check the cabinet is square before fully tightening all fittings. A diagonal lean can make one cam seem loose even though the problem lies elsewhere in the structure. After assembly, apply light pressure to the joint and watch for movement, then return the contents gradually.
If the cam immediately unwinds, the bolt may not be captured or the cam may be worn. If it turns freely through repeated rotations, stop. The mechanism is likely damaged or incorrectly seated. If it holds only while you push the panels together, inspect the bolt length and mating holes again. Do not bridge the joint with random screws unless a suitable repair has been designed for the panel construction.
Decide whether a part or panel needs replacement
A broken metal cam or bent bolt can often be replaced with a matching component. Take the old piece to a supplier or use the furniture maker’s parts service if available. Match dimensions, thread and connector pattern rather than appearance alone. A different bolt head can be too large for the cam or fail to lock at the right depth.
Panel damage is harder. If the large cam hole has broken out to the edge or the surrounding chipboard has become loose, a fresh cam may have nothing secure to bear against. Depending on the furniture’s value and load, a specialist may repair and reinforce the panel, or replacement may be more reliable. A wardrobe carrying a heavy door needs a higher level of confidence than a lightly used side table.
Repeated failures across several joints may indicate an assembly sequence problem, an uneven floor twisting the cabinet or a unit that has been dragged after assembly. Correcting one connector without addressing the overall load can simply transfer stress to the next cam. For a difficult reassembly, the site’s furniture assembly service is the relevant route.
Prevent the joint opening again
Follow the furniture maker’s load and wall-fixing instructions. Keep heavy items low and avoid moving a loaded unit by dragging it across the floor. If it must be moved, unload it, release any wall anchorage safely and lift it with sufficient help at strong points of the structure. After moving, check the cabinet is square and its cams remain engaged before reloading.
A sound cam joint depends on aligned panels, the correct bolt depth and intact board. Diagnose those three conditions before turning the screwdriver. That approach saves the small metal part and, more importantly, prevents a repairable loose joint from becoming a broken panel.